论文链接:Hierarchical
Text-Conditional Image Generation with CLIP Latents
非官方实现:lucidrains/DALLE2-pytorch
DALL-E 2 是一个比较经典的文生图模型,虽然和 Stable Diffusion
的架构有些区别,但是也利用了 CLIP
的文本-图像对齐能力实现了用文本作为条件进行图像生成。由于 CLIP
是输入文本和图像获得相应的特征,而 DALL-E 2
是将输入的文本转化为特征再转换为图像,相当于把 CLIP
中的图像编码器反转了过来,所以这个方法也被称为
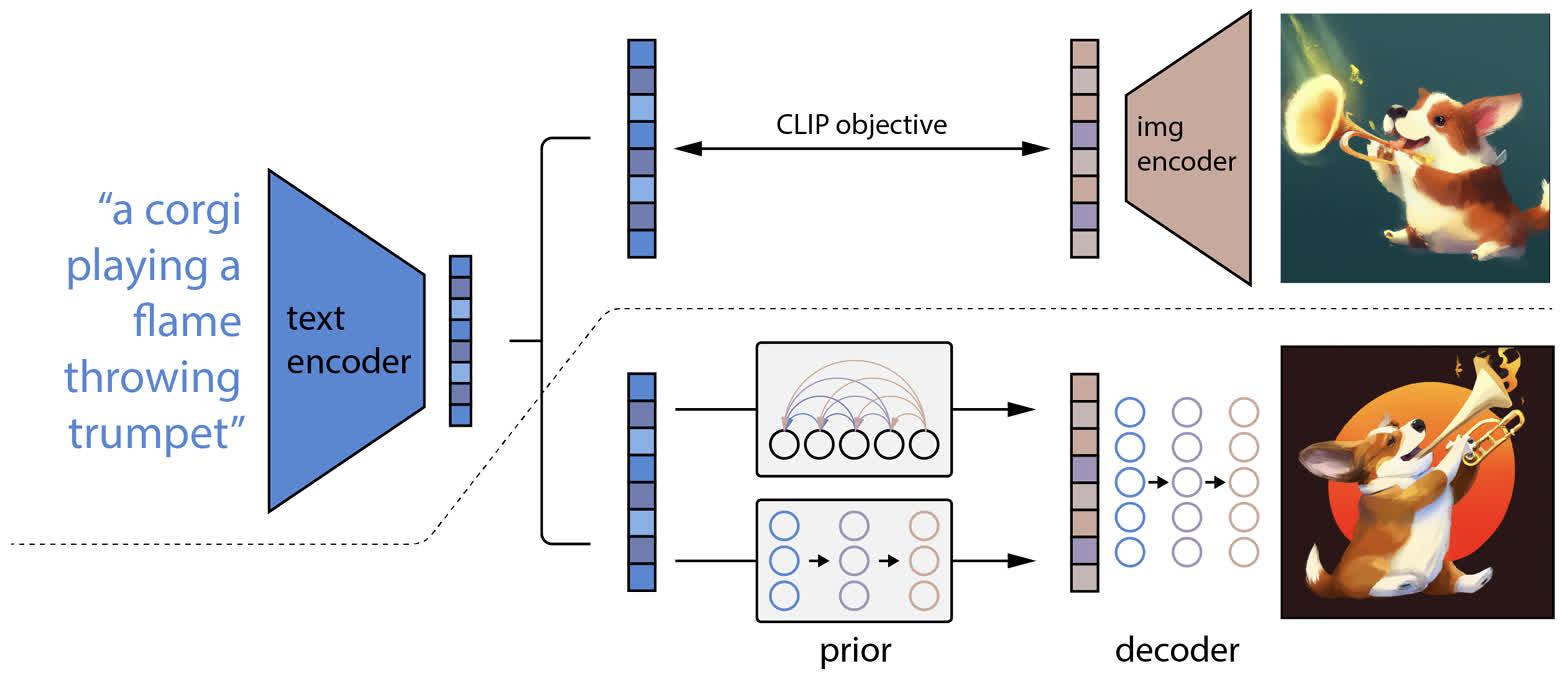
unCLIP。这个模型主要由三个部分组成:
- CLIP 模型:负责将条件文本转换到文本-图像的统一特征空间中;
- prior 模型:将文本特征转换为图像特征,用于后续的图像生成;
- decoer 模型:将从 prior
获得的图像特征转换为具体的生成图像,相当于反转了 CLIP 中的图像
encoder。
模型的架构图如下图所示,虚线的上方是 CLIP 模型,下方是 prior 和
decoder 模型。
DALL-E 2 的训练与采样
由于 DALL-E 2
由三个不同的部分组成,这三个模型都需要分别进行训练。
训练的第一步是训练 CLIP 模型,这部分和 CLIP
原本的训练过程是一样的,因此 DALL-E 2 可以直接使用已经训练好的 CLIP
模型。
第二步是训练 prior 模型,这个模型的作用是将 CLIP
的文本特征转换为图像特征,用于后续的生成步骤。作者个人感觉这一步不一定是必须的,因为
CLIP 中的文本特征与图像特征是对齐的,而且在 Stable Diffusion
中实际上也是直接用 CLIP 的文本特征和 latent 做交叉注意力。不过这里还是用
prior 模型做了一步转换,直观上来说可能转换一步之后可以弥补原先在 CLIP
中文本和图像特征没有对齐的那一部分。
这里的 prior 模型有两种可能的选择:
- 自回归模型(autoregressive
prior):将图像的特征转换为一系列离散的序列,用自回归的方式生成。(应该比较类似于用
Transformer 做 next token prediction 的任务)
- 扩散模型(diffusion
prior):相当于用文本特征作为条件,并用扩散模型生成图像特征。
由于两种模型的效果差不多并且扩散模型的效率更高,所以最后使用的是扩散模型。不过这里用的不是普通的基于
UNet 的扩散模型,而是使用了一个 decoder-only 的 Transformer
模型,并且预测的内容也是从预测噪声变成了直接预测 embedding。
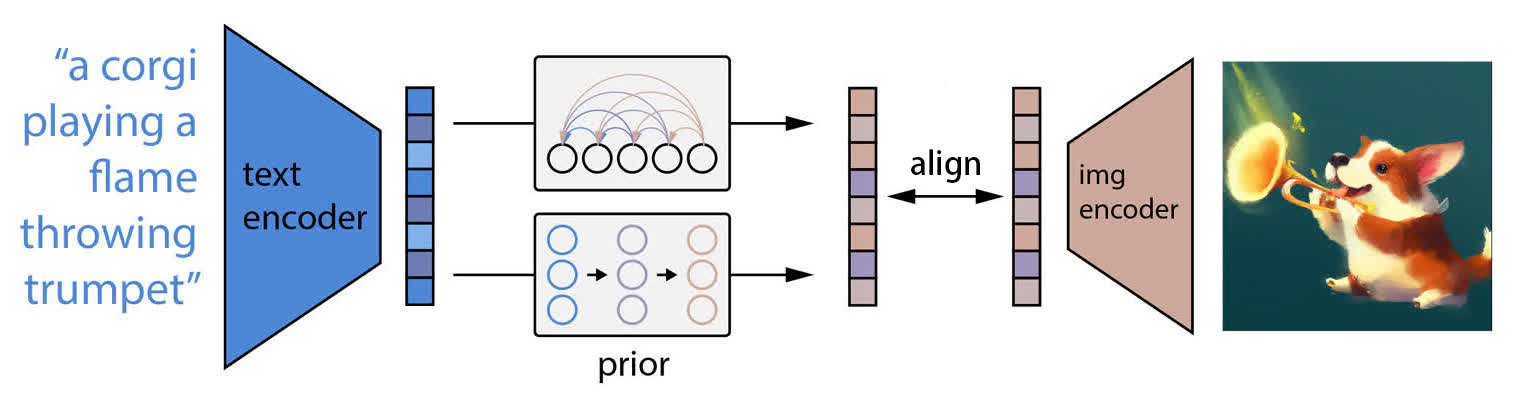
由于 prior 模型是要将文本特征转换为图像特征,训练目标也是将输出与
CLIP 原本的图像特征对齐,如图所示:
最后一步是训练 decoder
模型,这个模型需要以图像为条件,生成最终的目标图像。decoder
模型使用的是一个改进的 GLIDE(也是 diffusion model),训练流程和 GLIDE
是一致的。
在采样时,首先使用 CLIP 将文本进行编码,然后用 prior
将文本特征转换为图像特征,最后用 decoder 生图。
DALL-E 2 代码解读
因为 OpenAI 官方没有放出 DALL-E 2
的完整代码,这里主要参考的是文章最开始给出的非官方实现。这个模型的层次结构也很清晰:
1
2
3
4
5
6
7
8
9
10
11
12
13
14
15
16
17
18
19
20
21
22
23
24
25
26
27
28
29
30
31
32
33
34
35
36
| class DALLE2(nn.Module):
def __init__(
self,
*,
prior: DiffusionPrior,
decoder: Decoder,
prior_num_samples = 2
):
super().__init__()
self.prior = prior
self.decoder = decoder
self.prior_num_samples = prior_num_samples
self.decoder_need_text_cond = self.decoder.condition_on_text_encodings
@torch.no_grad()
@eval_decorator
def forward(
self,
text,
cond_scale = 1.,
prior_cond_scale = 1.,
return_pil_images = False
):
device = module_device(self)
one_text = isinstance(text, str) or (not is_list_str(text) and text.shape[0] == 1)
if isinstance(text, str) or is_list_str(text):
text = [text] if not isinstance(text, (list, tuple)) else text
text = tokenizer.tokenize(text).to(device)
image_embed = self.prior.sample(text, num_samples_per_batch=self.prior_num_samples, cond_scale=prior_cond_scale)
text_cond = text if self.decoder_need_text_cond else None
images = self.decoder.sample(image_embed=image_embed, text=text_cond, cond_scale=cond_scale)
return images
|
这里的 diffusion prior 大部分都和一般的 diffusion model
一样,不过主要需要关注两个方法。第一个是采样方法,和上述的流程一样,不过有一个上边没有介绍的细节,就是实际上采样了两个图像的
embedding,但是只使用了与文本最匹配的一个:
1
2
3
4
5
6
7
8
9
10
11
12
13
14
15
16
17
18
19
20
21
22
23
24
25
26
27
28
29
30
31
32
33
| class DiffusionPrior(nn.Module):
...
@torch.no_grad()
@eval_decorator
def sample(
self,
text,
num_samples_per_batch = 2,
cond_scale = 1.,
timesteps = None
):
timesteps = default(timesteps, self.sample_timesteps)
text = repeat(text, 'b ... -> (b r) ...', r=num_samples_per_batch)
batch_size = text.shape[0]
image_embed_dim = self.image_embed_dim
text_embed, text_encodings = self.clip.embed_text(text)
text_cond = dict(text_embed=text_embed)
if self.condition_on_text_encodings:
text_cond = {**text_cond, 'text_encodings': text_encodings}
image_embeds = self.p_sample_loop((batch_size, image_embed_dim), text_cond=text_cond, cond_scale=cond_scale, timesteps=timesteps)
text_embeds = text_cond['text_embed']
text_embeds = rearrange(text_embeds, '(b r) d -> b r d', r=num_samples_per_batch)
image_embeds = rearrange(image_embeds, '(b r) d -> b r d', r=num_samples_per_batch)
text_image_sims = einsum('b r d, b r d -> b r', l2norm(text_embeds), l2norm(image_embeds))
top_sim_indices = text_image_sims.topk(k=1).indices
top_sim_indices = repeat(top_sim_indices, 'b 1 -> b 1 d', d=image_embed_dim)
top_image_embeds = image_embeds.gather(1, top_sim_indices)
return rearrange(top_image_embeds, 'b 1 d -> b d')
|
第二个需要关注的是训练时的损失,这里预测的对象和普通的 diffusion
model 有所不同:
1
2
3
4
5
6
7
8
9
10
11
12
13
14
15
16
17
18
19
20
21
22
23
24
25
26
27
28
29
| class DiffusionPrior(nn.Module):
...
def p_losses(self, image_embed, times, text_cond, noise=None):
noise = default(noise, lambda: torch.randn_like(image_embed))
image_embed_noisy = self.noise_scheduler.q_sample(x_start=image_embed, t=times, noise=noise)
self_cond = None
if self.net.self_cond and random.random() < 0.5:
with torch.no_grad():
self_cond = self.net(image_embed_noisy, times, **text_cond).detach()
pred = self.net(
image_embed_noisy,
times,
self_cond = self_cond,
text_cond_drop_prob = self.text_cond_drop_prob,
image_cond_drop_prob = self.image_cond_drop_prob,
**text_cond
)
if self.predict_x_start and self.training_clamp_l2norm:
pred = self.l2norm_clamp_embed(pred)
if self.predict_v:
target = self.noise_scheduler.calculate_v(image_embed, times, noise)
elif self.predict_x_start:
target = image_embed
else:
target = noise
loss = self.noise_scheduler.loss_fn(pred, target)
return loss
|
decoder 的采样过程也没有什么特别的地方,就是普通的 diffusion model
采样过程,这里就不展开介绍了。
总结
DALL-E 2 刚出的时候也算非常火,不过这个模型也有 diffusion model
的一些通病,比如会出现不同主体的属性混淆、文本的生成效果比较差等情况。总体来说,个人感觉这个模型不如
Stable Diffusion 优雅,从后续的很多工作也可以看出,基于 Stable Diffusion
继续进行拓展的方法才是主流,基于 DALL-E 2 的方法还是比较少的。
参考资料:
- DALL·E 2 解读 |
结合预训练CLIP和扩散模型实现文本-图像生成